 Adding content
How to add your text and pictures to the site.
All Notanant sites are fully editable directly from a web-browser. If you have the necessary access permissions you will see an Edit this page button or an Add New... button on the pages you are browsing.
Notanant has a "what you see is what you edit" principle. There is no separate administrators area. You go to the page or area you want to edit and edit it. You can always revert to a previous page by going to the 'page variations' which include a page history and alternate language versions of the page.
The "what you see is what you edit" principle means you can open up parts of the site or all of the site to other editors through members and permissoins and everyone can still see where their bit fits. Because of the way Notanant understands websites and has a structure, things like links and link management are pretty much handled automatically you. You just concentrate on the content (of course you can add links by hand if you need to too).
Adding text
To add text to a page, first navigate to the page you want to add to, then you should see a link to edit the page (if you don't see the link, you haven't been given permission by the site owner). This then goes to an edit page, where you can enter text into different fields. Note that the text in the summary section may be used in a different way. It is not necessary to fill out all options.
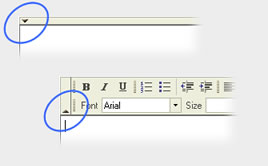
To use rich-text styles like italic, bold and to change the colour, select the toogle in the top left corner to flip to full edit mode. You can also add in extra headings.

Adding pictures
To add your own images to the site you first need to upload them into Notanant. If you have the editor menu on screen, you will see an image icon which says "Add an image". Click on it to upload an images straight into the sites image library, or to add existing images to your page.
You can also find images under site resources. You can use special codes to place these on the page, like the one below.

First, go to your sites main page then click 'site resources'. Here you can upload new images and see all the images you have on the system. You also have options to resize an image and give it a reference title (which will come through as an ALT tag).
To use an image, simply copy the code next to the image into your clipboard (Windows: CTRL+C, Mac: Apple+C). You can then paste this code into the text fields when editing a page (Windows: CTRL+V, Mac: Apple+V).
By default the image will be created on a new line, if however you want the image to float in amongst the text on the left or right you can add an 'l' or 'r' after the %% in the code.
%%rimage=X525_514_imgcode.gif
For more infomation see 'help with images' in the administration section. (You can add images using a standard HTML <img> tag, but we advise against this as the image may change location in the future and so may disappear).

